Saturday, December 31, 2011

2012 Food and Blog Goals


2012. It just feels weird saying it. I always think of that movie with John Cusack where Yellowstone blows up and all of that other crazy stuff happens. I just got used to saying 2011 so I can't believe this next year is already here! I did okay on my goals for last year so I figured I would do the same thing this year. I've carried over the things that I didn't accomplish last year and added a few new things as well!

2012 Food and Blog Goals

1. Post once a week- I was proud of myself for posting an average of 2 times a week for the whole year but my goal for this year is to not skip weeks of posting.

2. Host another giveaway

3. Keep up with my blogging group

4. Host a dinner party- this one is from last year but I think I will accomplish it this year!

5. Tamales

6. Dog Treats

7. Royal icing

8. Try and finish my 23 x 23 or at least accomplish half of it

9. Do a monthly review post at the end of the month- Most of my family reads this blog so I'd like to do a recap of my month with pictures and words.

10. Actually finish all of these goals!

Happy New Years!


Friday, December 30, 2011

Giveaway Update

Thanks for all the entries! It was neat to read about everyone's favorite foods and traditions. The winner of the Taste of Home Cookbook giveaway is Ally S! Congrats!

Send me an email at tbarber @ live . com with your address and I will mail it to you right away! Thanks for all the entries! Happy New Year!

Wednesday, December 28, 2011

2011 Food/Blog Goals-How Did I Do?

Last year, I made a list of 10 Food/Blog Related Goals I wanted to accomplish in 2011. In true-Tyler fashion, I promptly forgot about them and didn't exactly carry most of them through. Halfway through the year, I remember and tried to do some

1. Post at least twice a week-success! Kind of. I didn't post twice a week but if you add up all of my posts, and divide by two, it's more than 52 so therefore, success!

2. Host a giveaway-success! Better late than never. I finally hosted one about two weeks ago. Congrats to the lucky winner!

3. Do a blog makeover- success! Any remember the pink overload that reminded me of Victoria's Secret? Do you like the new look? Should I change it up again in the upcoming year?

4. Join some kind of blogging group-success! The ladies on one of the cooking boards I look at put together a recipe swap that I've participated in a few times. Here is the link for all of the recipes I've made through that.

5. Host a dinner party-had lots of people over to dinner but I didn't quite make the dinner party I was aiming for

6. Work with yeast-success! I've successfully made pizza dough 4 times this year. I'm still working on the seasonings and such for the crust but when I perfect it, I'll post it!

7. Tamales

8. Dog Treats

9. Grill More-success! This one wasn't too hard considering we didn't grill on our own even once in 2010. We used the grill our apartment complex provided at least 4 times this summer, including when the County of San Diego had a massive blackout and we were stuck with no power for about 12 hours in September.

10. Royal Icing

6/10 isn't too bad. I didn't pass but I did better than I expected. I can't wait to make some new goals for next year! Any ideas?

Sunday, December 18, 2011

A Christmas Giveaway!

Time for my first ever giveaway! This has been a goal of mine since last year and it's finally happening. It took awhile for me to decide what I wanted to give. I didn't want it to be something random but something that I use a lot and think others would find useful. So, the lucky winner of this giveaway will win:
My mother-in-law got me a TOH cookbook a few years ago and I love it! I use it quite a bit and some of our favorite recipes like Homemade Manicotti, Meatloaf (Neil's favorite), and Cheesy Chicken Lasagna come from that cookbook. Taste of Home no longer sells the one I own but this one has some delicious looking recipes.

To enter, leave a comment on this post telling me what your favorite holiday food is. One entry per person. Will ship to US residents only. Deadline is Friday, December 23 at 10:00 pm, EST. One winner will be chosen at random and announced sometime next week! Good luck!

Wednesday, December 14, 2011

Vodka Cream Pasta


This recipe means another check on my 23 x 23 list. That means I'm 3/20 so far. I think I need to pick up the pace on that list.

Rachel Ray calls this her "You Won't Be Single for Long Pasta." I'm not single but if cooking skills could make a guy fall in love, this recipe would definitely give him a push. The hint of vodka with the cream and tomatoes provides a nice balance of flavors.


Vodka Cream Pasta
Source: Rachel Ray, feat. on Dr. Oz

1 tbsp EVOO
1 tbsp butter
2 cloves garlic, minced
2 shallots, minced
1 cup vodka
1 cup chicken stock
32 oz can crushed tomatoes
coarse salt and pepper
16 oz pasta, such as penne rigate
1/2 cup heavy cream
20 fresh basil leaves, shredded or torn

Heat a large skillet over moderate heat. Add the extra virgin olive oil, butter, garlic, and shallots. Gently saute the shallots for 3-5 minutes. Add the vodka to the pan. Simmer and reduce the vodka by half, about 2-3 minutes. Add the chicken sauce and the tomatoes. Bring to a bubble and reduce heat to simmer. Season with salt and pepper.

While the sauce simmers, cook the pasta in slated boiling water.

Stir the cream into the sauce. When the sauce returns to a bubble, remove it from heat. Drain pasta and toss with sauce and basil leaves. Enjoy!

Monday, December 12, 2011

No Yeast Bread


I've finally ventured into using yeast, but so far, I've only used it for pizza dough. Eventually, I want to start making my own bread. But for now, I stick with this yeast-less bread recipe. The basic recipe is below; you can dress it up with whatever you want. I added rosemary and sea salt to this one.

No Yeast Bread
Source: Earth Notes

4 cups flour
1 tbsp sugar
1/2 tbsp baking powder
1/2 tbsp baking soda
1.5 cups water
2 tsp cider vinegar
1 tbsp butter

Combine the dry ingredients and mix. Combine water and vinegar and add to the dry ingredients;mix well. Knead for 2-3 minutes on a flour surface or with electric mixer. Shape into a round and place on pan. Bake for 40 minutes. Remove and glaze with 1 tablespoon of softened butter. Enjoy!

Tuesday, December 6, 2011

How to Peel Garlic in 10 Seconds

Okay so I know I haven't posted in pretty much forever, but I have a legitimate excuse. I have 6 classes this semester that I'm finishing up and I've just entered "Hell Week." I have 4 group projects, 4 papers, and 6 tests along with about 10 other assignments to finish between last week and this week. We've been eating spaghetti and Ragu sauce along with leftovers and whatever else has been hiding in our closet for forever. My dinner tonight consisted of celery and parmesan. How's that for an embarrassing food blogger confession?

Eventually, I'll actually post a recipe but for now I just have to share this video I found while procrastinating. Here is how to peel garlic without having to use a knife or get your fingers all gross. Be amazed, my friends.

Monday, November 28, 2011

Chicken Pot Pie


This might just be one of the best things I've ever made. It's comfort food at its best. The hubs was silent for about 5 minutes when he was eating it. Then, he looked at me, and said, "This is amazing."

The only un-amazing thing about this is that when you reheat the leftovers the next day for lunch, it's a little dry. I was really excited for it the next day but it was really dry. Adding a little extra chicken broth helped a lot though.


I also got a little inspired by Pinterest and made a braided pie crust for the edge. It adds a nice little touch, especially if you are serving it to guests. If you have any leftover turkey from Thanksgiving, you could sub that for the chicken


Chicken Pot Pie
Source: adapted from Allrecipes

1 pound skinless, boneless chicken breast-cubed (I used a small rotisserie chicken)
1 cup carrots, diced
1 cup frozen green peas
1/2 cup celery, diced
1 russet potato, diced
chicken bouillon cube
2/3 cup butter
1/2 cup onion, diced
2/3 cup all-purpose flour
1/2 tsp salt
1/4 tsp black pepper
1/4 tsp celery seed
garlic salt, to taste
3 cups chicken broth
1 1/3 cups milk
2 (9 inch) unbaked pie crusts (I used the refrigerated ones)
1 egg

Preheat oven to 425º. In a saucepan, combine chicken, carrots, peas, celery, and potato. Add water to cover and chicken bouillon cube (or extra chicken stock). Boil for 20 minutes. Remove from heat, drain, and set aside.

In a saucepan over medium heat, melt butter and cook onions in it until soft and translucent. Stir in flour, salt, pepper, celery seed, and garlic salt. Slowly stir in chicken broth and milk. Simmer over medium-low heat until thick. Remove from heat and set aside.

If using the roll our refrigerated pie crusts, place one in a greased pan. Make an egg wash with the egg and a little water and brush over bottom crust. Bake for 5 minutes. Then, or if using an unbaked pie crust, place the chicken mixture in the bottom. Pour hot liquid mixture over. Make sure the liquid has mixed with the chicken mixture or else it will be slightly dry. Cover with top crust, seal edges, and cut away excess dough. You can use this dough for a braided pie crust. Brush top with egg wash. Make several small slits in the top to allow steam to escape.

Bake in a preheated oven for 30-35 minutes, or until pastry is golden brown and the filling is bubbly. Cool for 10 minutes before serving. Enjoy!


Tuesday, November 22, 2011

Mashed Potatoes

Last Easter I (GASP) used instant mashed potatoes. I know. That's about the worst thing a food blogger can admit to doing. Cooking a huge meal by yourself is hard. And my fridge wasn't big enough to peel all the potatoes and store the night before.

We went the more classy route this Thanksgiving and made real mashed potatoes. These were delicious. The basic recipe is below and then you just need to season them however you like. We just used salt, pepper, and garlic. If you are making these for Thanksgiving, you can peel and cube the potatoes the night before. Just store in water overnight.

Mashed Potatoes
Source: adapted from Allrecipes

6 medium russet potatoes, peeled and cubed
1 cup warm milk
1/2 cup butter or margarine
salt and pepper and garlic salt to taste

Place potatoes in a saucepan and cover with water. Cove and bring to a boil; cook for 25-25 minutes or until very tender. Drain well. Add milk, butter, salt, pepper, and garlic salt to taste. Mash until light and fluffy.

Maple-Glazed Roasted Carrots

I forgot to bring my camera to Whitney's house to take pictures of Thanksgiving dinner. Sorry :)

When planning our menu for Thanksgiving, I was reminded of the rule my parents had for us when we were eating at buffets. We always had to have at least three colors on our plate. If not, we'd always come back with a plate full of carbs. My three colors were usually yellow (corn), green (salad or pickles), and white (mashed potatoes). For some reason, when you go to buffets, vegetables just aren't as enticing as all the carbs.

It's the same when planning a big menu. I find it so easy to think of carb side dishes but when I look at the overall menu, I realize I have 10+ carbs and 1 vegetable. So then I have to go back and edit down the list of carbs and add more vegetables. That's exactly what happened with this years menu. The only vegetables I had on the menu were corn and green bean casserole. I added these carrots at the last minute and I'm glad I did.

They taste like regular roasted carrots but the addition of maple syrup gives them just a touch of sweetness.

Maple-Glazed Roasted Carrots

1 lb carrots, peeled and cut on the diagonal line into the same size pieces
1 tbsp olive oil
1 tbsp maple syrup
salt and fresh-ground pepper to taste

Preheat oven to 400º. Heat olive oil in and oven proof frying pan to medium-hot. Add the carrots (you'll hear a slight sizzling sound). Saute carrots 3-4 minutes, or until the surface is slightly blistered and starting to color.


Turn down heat to low and add maple syrup and stir to coat carrots. Season well with salt and pepper.

Put frying pan into hot oven and roast carrots for 1o-15 minutes, or until they are slightly browned and done to your liking. Serve hot. Enjoy!

Monday, November 21, 2011

Crock Pot Baked Apples


I love Pinterest. It's an addicting kind of love but I like it. One of my favorite things to pin is food. I love looking at all the pictures and getting inspiration. When I saw these, I was reminded of the cinnamon baked apples they used to serve in elementary school lunches.

These were the perfect fall dessert to follow our pumpkin meal. They were easy to prepare and they made the apartment smell delicious while they were baking.


Crock Pot Baked Apple
Source: Skinny Chef

1/4 cup brown sugar
1/4 cup walnuts, chopped
2 tbsp trans-fat free magarine
1 tsp cinnamon
6 Gala or Macintosh apples, cored
1/2 cup apple juice or apple cider
2 tbsp prange liquor, optional

Preheat a large crock-pot on high heat and preset it for 3 hours. In a large bowl, mix brown sugar, walnuts, margarine, and cinnamon. Fill the apples with the filling and place them in the crock-pot. Pour in the apple juice or cider and the liquor, if using. Cover and cook 2.5-3 hours on high heat until the apples are soft and begin to collapse. Enjoy!

Sunday, November 20, 2011

Thanksgiving 2011 Menu


We actually celebrated Thanksgiving a little early, on last Friday. My friend Whitney was going out of town for the actual holiday and asked me to help her cook her first homemade Thanksgiving meal. We started shopping at 12:30 on Friday and didn't finish cooking until 6:45. It was a long day but well worth all the time we spent cooking. Below is our menu for 12. I'll post actual recipes later this week.

Our plans for Thanksgiving day are still undecided. We were originally planning on going to Arches National Park and having an untraditional Thanksgiving meal around the campfire but we decided to put that on hold for now. I can't imagine cooking another large meal but I'm sure I'll give in and do it!

Appetizers
Pigs in a Blanket

Dinner
Turkey
Maple Glazed Roasted Carrots
Green Bean Casserole
Corn
Mashed Potatoes
Stuffing
Biscuits with Pumpkin Butter
Cranberry Sauce
Deviled Eggs

Dessert
Pumpkin Pie
Cake

Friday, November 18, 2011

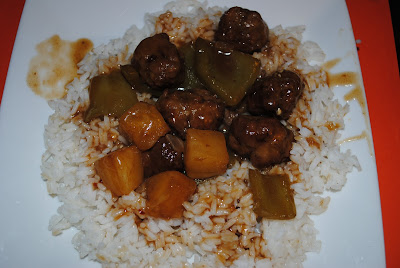
Meatballs with Peppers and Pineapples


Does anyone else feel like Asian food is kind of addicting? I think it's the sauce. The sauce is always delicious and makes me want to eat more rice. Although it's not a traditional Asian recipe by any means, I was definitely addicted to these sauce-covered meatballs.

This was really easy to make but tastes like it took awhile. If you like spice, up the crushed red pepper.

Meatballs with Peppers and Pineapples

1 1/4 lb ground beef
1/2 onion, diced
1 whole egg
1/2 cup bread crumbs
1 tsp salt
freshly ground black pepper, to taste
1/2 tsp crushed red pepper, more to taste
1/4 cup All-Purpose flour
canola oil, for frying
2 whole green peppers, seeded and diced roughly
1 1/2 cup fresh pineapple chunks
2 cups beef stock
2 tbsp soy sauce
1/2 cup sherry or wine vinegar
1/3 cup sugar
1 tbsp cornstarch
salt to taste
crushed red pepper to taste
extra beef stock, if needed
rice, cooked (optional)

Combine ground beef, diced onion, egg, salt, pepper, breadcrumbs, and crushed red pepper. Mix well with hands until combined. Roll meat mixture into small balls and place on a cookie sheet. Freeze on the pan for 15 minutes to firm.

Mix together beef stock, soy sauce, sherry (or vinegar, sugar, and cornstarch.

Heat canola oil over medium-high heat. Roll meatballs in flour, then fry in two batches until nice and brown, about 2 minutes per batch. Remove meatballs and set aside on a separate plate.

Pour off oil from pan and return pan to medium-high heat. When pan is hot, throw in the chopped green peppers and cook for one minute. Add pineapple to pan and cook for one minute, stirring gently. Pour in stock/soy sauce mixture, then add meatballs. Stir gently to combine and cook for one minute, or until sauce is thickened. Add salt and crushed red peppers to taste.

Serve over cooked rice. Enjoy!

Wednesday, November 16, 2011

Six Can Tortilla Soup


This recipe makes it on our weekly meal list at least once a month, usually twice. It's cheap and easy and pretty delicious. It's rated 5 stars on Allrecipes and it deserves the rating, but only if you make some changes. The original recipe calls for canned chunk chicken, but you can't expect a 5 star recipe to use chunk chicken. Instead, cook up some chicken breasts and either cut them up or shred them into the soup. I leave the black beans out since the hubs doesn't like them and sometimes I exchange one of the chicken broth cans for cream of chicken soup to give it a different flavor. By the time I'm done with it, it's usually more like "4 can tortilla soup with some extras," but it's still worth trying.

Six Can Tortilla Soup
Source: Allrecipes

1 15 oz can whole kernel corn, drained
1 14.5 oz cans chicken broth (or 1 chicken broth and 1 cream of chicken soup)
1 10 oz can chunk chicken (go for 2-3 shredded chicken breasts, cooked)
1 15 oz can black beans, rinsed
1 10 oz can diced tomatoes with green chile peppers, drained
cumin
chili powder
garlic powder
cheese, optional
sour cream, optional
tortilla chips, optional

Add all of the cans into a large stock pot. Add seasonings to taste. Simmer over medium heat until everything is heated through. Serve, topped with cheese, sour cream, and tortilla chips. Enjoy!

Monday, November 14, 2011

Ragu a la Bolognese


I hope y'all enjoyed all the pumpkin recipes! I had a lot of fun looking for recipes to try and trying out all the ones I picked. I'm still enjoying some pumpkin snickerdoodles with my pumpkin spice latte!

There isn't a trace of pumpkin in this recipe but it sure was good. It does take awhile to make so I suggest picking a day where you have lots of time to prepare dinner. It also makes quite a lot of spaghetti sauce so you may want to think about freezing half and saving it for later.


Ragu a la Bolognese

1 lb ground beef
1 pound italian sausage
7 oz bacon or pancetta, sliced
1 ;arge onion, diced
2 celery stalks, diced
1 medium carrot, diced
2 garlic cloves, minced
28 oz can diced tomatoes
2.5 tbsp tomato paste
2 cups milk
1 tsp salt
1/4 tsp ground nutmeg
1/4 tsp pepper
3.5 cps beef broth
2.5 tbsp fresh basil chopped
pinch of dried basil
1 bay leaf
2 tbsp butter
2 tbsp olive oil

In a large stockpot or dutch oven, melt butter and oil over medium-high heat. Add the bacon and cook for 4 minutes. Add the vegetables and garlic and cook an additional 5 minutes. Crumble the ground meats into the pan and cook for 8-10 minutes, until browned.

Pour in milk and nutmeg. Bring mixture to a boil then reduce heat and simmer uncovered for 10 minutes. Stir in tomato paste and simmer for an additional 10 minutes.

Add the diced tomatoes, broth, basil, bay leaves, pepper, and salt. Bring the sauce to a boil and then reduce heat and simmer for 2 hours, stirring occasionally.

After sauce has rested for a little while, skim the grease off the top of the sauce. Adjust seasonings as needed and serve over hot pasta. Enjoy!

Friday, November 11, 2011

Pumpkin Week: Pumpkin Snickerdoodles


Hope y'all are enjoying all the pumpkin recipes! Today's recipe stood out to me because it involves a cookie you normally only see at Christmas: Snickerdoodles.


But these are even better than regular snickerdoodles because they have pumpkin in them! I love baking with pumpkin because it gives the cookies a different texture. These were delicious. The pumpkin flavor wasn't super pronounced but you could definitely taste it.

Pumpkin Snickerdoodles

For the cookies:
1 cup (2 sticks) salted butter, at room temperature
1.5 cups granulated white sugar
3/4 cup unsweetened pumpkin puree
1 large egg
2 tsp vanilla extrace
3 3/4 cup all-purpose flour
1 1/2 tsp baking powder
1/2 tsp salt
1/2 tsp ground cinnamon

For the rolling sugar:
1/2 cup granulated white sugar
1 tsp ground cinnamon
1/2 tsp ground ginger
1/2 tsp ground allspice

In a large mixing bowl, use an electric mixer to cream the butter until fluffy. Add sugar and pumpkin puree and beat well. Mix in egg and vanilla, scraping down the sides of the bowl to incorporate all the ingredients.

In a medium bowl, whisk together flour, baking powder, salt, and ground cinnamon. Beat the flour mixture into the liquid mixture a little at a time until just incorporated.

Cover dough with plastic and chill at least an hour, or until dough becomes slightly firm.

When ready to bake, preheat oven to 350º. Line baking sheets with parchment paper, or spray with nonstick spray. Mix rolling sugar ingredients in a small bowl.

Remove cookie dough from refrigerator. Use a medium cookie scoop or a large spoon to scoop out dough and roll into balls. Use your hands to roll the balls in cinnamon sugar nd make sure they are coated really well. Place 2 inches apart on prepared cookie sheets. Use a flat-bottomed glass dipped in sugar and flatten the balls.

Bake at 350º for 10-14 minutes, until they are slightly firm to the touch. Let cool on baking sheets for 5 minutes and then remove them to a wire rack and cool completely. Enjoy!

*Store in an airtight container. These cookies freeze well. Just place them in a freezer zip bag and remove from freezer when the craving hits.

Thursday, November 10, 2011

Pumpkin Week: Pumpkin Roll


Sometimes, I don't follow recipes to the exact letter. I make substitutions if I'm missing an ingredient or I add a little sumthin sumthin if I think it will make the recipe even better. And sometimes, like in the case of the Fiery Arrabiata Sauce, I misread tsp as tbsp and almost burn my husband's tongue off. Hey, everyone makes mistakes.

Then, there are nights like last night. I was preparing today's recipe and realized I had neither butter nor wax paper. But, I had pumpkin butter so I subbed that instead. Good idea. It changed the color of the filling but it was still delicious. As for the lack of wax paper, I was too lazy to run to the grocery store for one thing and I decided to make it without wax paper, because, hey, I'm risky like that. Big mistake. My pumpkin roll ended up looking like this:


Just so everyone is clear on what a roll actually looks like, it should have looked like this:

Photo from Fashionably Foodie-check her out, she has some yummy recipes and photos and she can obviously follow directions and make a beautiful pumpkin roll.

I encountered just one problem when removing it from the pan: it cracked in half. I tried pushing the warm insides together with my fingers to seal the crack but it didn't work. I still attempted to roll it but I caused another crack. So I gave up and slathered on the filling and cut myself a slice to reward me for a job done badly.

It was good. It didn't even matter that it wasn't rolled right and the colors weren't perfect. Sometimes different is just fine.

Pumpkin Roll
Source: How Does She

Roll
1 cup sugar
1 tsp baking soda
3/4 cup flour
2/3 cup canned pumpkin
3 eggs
1/2 tsp cinnamon
1/3 cup walnuts, optional

Filling
8 oz cream cheese
1 tsp vanilla
1 cup powdered sugar
2 tbsp soft butter (or pumpkin butter)


Preheat oven to 375º. Line a cookie sheet with wax paper and grease well.

Mix first 6 ingredients. Pour onto greased pan and sprinkle with nuts, if desired. Bake in preheated oven for 15 minutes.

While the bread is baking, you can prepare the filling. Mix all of the filling ingredients together until mixture is smooth.

How Does She has a great photo tutorial of the next step. Basically, you lift the roll from the pan on the wax paper and flip it upside down on a tea towel. Then you roll the tea towel up to form a log. Let the roll cool inside the towel for about 10 minutes. Then, unroll the towel and spread the filling evenly across the roll. If you want to be different, stop right here and enjoy the pumpkiny goodness. If you want yours to be pretty and fit to serve to company, roll it back up. Enjoy!


Wednesday, November 9, 2011

Pumpkin Week: Pumpkin Spice Latte


Welcome to day 3 of Pumpkin Week! I hope you've been inspired by the Dinner in a pumpkin or that you're craving some Pumpkin Butter. Before we get to todays recipe, I thought I'd share some pictures of us carving our pumpkin.


Living in an apartment complex, not only do you have a miniscule kitchen, but your husband also doesn't get many opportunities to us his drill and other handy tools. When I suggested we break out the drill for our pumpkin, he was all for it. I took a turn drilling a few wholes but mostly left all that heavy duty man stuff up to my manly husband. Because he looks good wielding that drill.


That's right, we used our drill to create a polka dotted pumpkin! Our scary faces aren't that scary and we didn't have enough skills to make some complicated drawing/carving so instead we made it polka dotted. And I love it. It's fun and doesn't seem out of place now that Halloween is over.


Besides carving pumpkins, one of my favorite Fall things is pumpkin spice lattes from Starbucks. But daily coffees from Starbucks get expensive so I decided to try a homemade version. It was delicious and super cheap. And just so you know, whipped cream makes things so much better.

Pumpkin Spice Latte
Source: Recipe Girl

1/2 cup whole milk
1 tbsp unsweetened canned pumpkin puree
1 tsp packed light brown sugar
1/4 tsp pumpkin pie spice
1 tsp vanilla extract
1 cup hot brewed, strong coffee
2 tbsp half & half cream
1 tsp granulated white sugar, or more to taste
whipped cream, optional but not really cause whipped cream makes everything better
ground nutmeg

In a microwave-safe glass or bowl, whisk together milk, pumpkin, brown sugar, spice, and vanilla. Microwave for 1-2 minutes. Watch closely and remove from microwave when it gets hot and frothy.

Pour the pumpkin milk into a tall mug or glass. Add hot coffee. Pour in the cream and add a teaspoon of sugar. Stir and taste, adding more sugar, if desired.

Top with whipped cream and a sprinkle of nutmeg. Serve immediately. Enjoy!

Tuesday, November 8, 2011

Pumpkin Week: Dinner in a Pumpkin


When you're married to someone in the military, you learn lots of stuff. You learn nothing is ever set in stone until it's already happened. You learn to hurry up and then wait. You learn a whole lotta TLA's and FLA's (that's three letter acronyms and four/five letter acronyms). You learn ranks and other military things. But one of the most important things you learn is that friends can be just like family.

It's an important lesson when you're over 2000 miles from home and your close family members. So you take your friendly family (family friends?) and make the best of being far from home. You make new traditions. Like going to the pumpkin patch when it's 80º outside. Here's a few pictures from the pumpkin patch before you get your next pumpkin recipe!

Clockwise from top left: Some of the best people I know out here and the group that came with us to the pumpkin patch (look closely-the lady tried to crop Stout out from the bottom). Stout feeding goats at the pumpkin farm. The guys get a little crazy when thy are all together-plus DADT was repealed so there's nothing holding them back (kidding). Neil and his bestie, Stout.

Left: Our roomie, Michael, and his girlfriend, Whitney. They are kinda the cutest couple I know. Right: Me, the hubs, and his awkward picture takingness :)

Left: Neil, Jar, and Stout showing off their human totem poll skills and their uber-closeness. Right: Karisa (who gifted me with the pumpkin butter and joined us for a pumpkin dinner) and her husband, Ivan.


The pumpkin patch was almost as awesome as the people we went with. It was Neil and I's second time going to Bates Nut Farm and we were glad to have everyone along with us. While we were there, Karisa suggested doing dinner in a pumpkin so we made a date. On Friday, she and her hubby came over and we wowed the guys with our pumpkin presentation skills.


That's right, dinner was served inside the pumpkin! The pumpkin became the bowl/cooking receptacle and what made it even better was that you could scrape some of the pumpkin off the side and enjoy it with your dinner.


I'm not a mushroom person but this was delicious. You could do all types off things inside these pumpkin bowls (pumpkin chile, anyone?) but I definitely suggest following the recipe below.

Dinner in a Pumpkin

4 small pumpkins or 1 medium pumpkin (use 4 if you want everyone to have their own individual pumpkin bowl)
1.5 lbs ground beef
1 small onion, chopped
2 tbsp oil
1/2 cup celery, chopped
2 tbsp soy sauce
1 tbsp brown sugar
1 can sliced mushrooms
1 small can cream of chicken soup
1-1/2 cups cooked rice
1 can sliced water chestnuts, drained

Preheat oven to 350º. Wash the outer surface of the pumpkins thoroughly. Cut a circle in the top, just like if you were going to carve the pumpkin. Remember to slant the knife so that the lid doesn't fall straight through. Clean out all of the seeds and stringy pulp. Rinse well and set aside.

Heat the oil in a sauce pan. Add ground beef and cook until brown, drain. Add onion and celery and cook until translucent, about 2 minutes. Once, the vegetables are done, add the brown sugar, soy sauce, cream of chicken soup, mushrooms, cooked rice, and water chestnuts. Mix well.

Place the cleaned pumpkins on a cookie sheet. Scoop the mixture into the pumpkin and place the pumpkin top back on. Put the pumpkins into the oven and cook for 1-2 hours. Check after an hour. The cooking time will vary according to size of the pumpkin. Our little ones took just over an hour. You will know it is done when the pumpkin is tender and the mixture is bubbling all the way through.

Serve warm. Enjoy!